General information about the WiPy
No floating point support
Due to space reasons, there’s no floating point support, and no math module. This means that floating point numbers cannot be used anywhere in the code, and that all divisions must be performed using ‘//’ instead of ‘/’. Example:
>>> r = 4 // 2  # this will work
>>> r = 4 / 2   # this WON'T
Before applying power
Warning
The GPIO pins of the WiPy are NOT 5V tolerant, connecting them to voltages higher than 3.6V will cause irreparable damage to the board. ADC pins, when configured in analog mode cannot withstand voltages above 1.8V. Keep these considerations in mind when wiring your electronics.
WLAN default behaviour
When the WiPy boots with the default factory configuration starts in Access Point
mode with ssid that starts with: wipy-wlan and key: www.wipy.io.
Connect to this network and the WiPy will be reachable at 192.168.1.1. In order
to gain access to the interactive prompt, open a telnet session to that IP address on
the default port (23). You will be asked for credentials:
login: micro and password: python
Telnet REPL
Linux stock telnet works like a charm (also on OSX), but other tools like putty
work quite well too. The default credentials are: user: micro, password: python.
See network.Server for info on how to change the defaults.
For instance, on a linux shell (when connected to the WiPy in AP mode):
$ telnet 192.168.1.1
Local file system and FTP access
There is a small internal file system (a drive) on the WiPy, called /flash,
which is stored within the external serial flash memory. If a micro SD card
is hooked-up and mounted, it will be available as well.
When the WiPy starts up, it always boots from the boot.py located in the
/flash file system. On boot up, the current directory is /flash.
The file system is accessible via the native FTP server running in the WiPy. Open your FTP client of choice and connect to:
url: ftp://192.168.1.1, user: micro, password: python
See network.Server for info on how to change the defaults.
The recommended clients are: Linux stock FTP (also in OSX), Filezilla and FireFTP.
For example, on a linux shell:
$ ftp 192.168.1.1
The FTP server on the WiPy doesn’t support active mode, only passive, therefore, if using the native unix ftp client, just after logging in do:
ftp> passive
Besides that, the FTP server only supports one data connection at a time. Check out the Filezilla settings section below for more info.
FileZilla settings
Do not use the quick connect button, instead, open the site manager and create a new
configuration. In the General tab make sure that encryption is set to: Only use
plain FTP (insecure). In the Transfer Settings tab limit the max number of connections
to one, otherwise FileZilla will try to open a second command connection when retrieving
and saving files, and for simplicity and to reduce code size, only one command and one
data connections are possible. Other FTP clients might behave in a similar way.
Upgrading the firmware Over The Air
OTA software updates can be performed through the FTP server. Upload the mcuimg.bin file
to: /flash/sys/mcuimg.bin it will take around 6s. You won’t see the file being stored
inside /flash/sys/ because it’s actually saved bypassing the user file system, so it
ends up inside the internal hidden file system, but rest assured that it was successfully
transferred, and it has been signed with a MD5 checksum to verify its integrity. Now, reset
the WiPy by pressing the switch on the board, or by typing:
>>> import machine
>>> machine.reset()
Software updates can be found in: https://github.com/wipy/wipy/releases (Binaries.zip). It’s always recommended to update to the latest software, but make sure to read the release notes before.
Note
The bootloader.bin found inside Binaries.zip is there only for reference, it’s not
needed for the Over The Air update.
In order to check your software version, do:
>>> import os
>>> os.uname().release
If the version number is lower than the latest release found in the releases, go ahead and update your WiPy!
Boot modes and safe boot
If you power up normally, or press the reset button, the WiPy will boot
into standard mode; the boot.py file will be executed first, then
main.py will run.
You can override this boot sequence by pulling GP28 up (connect
it to the 3v3 output pin) during reset. This procedure also allows going
back in time to old firmware versions. The WiPy can hold up to 3 different
firmware versions, which are: the factory firmware plus 2 user updates.
After reset, if GP28 is held high, the heartbeat LED will start flashing
slowly, if after 3 seconds the pin is still being held high, the LED will start
blinking a bit faster and the WiPy will select the previous user update to boot.
If the previous user update is the desired firmware image, GP28 must be
released before 3 more seconds elapse. If 3 seconds later the pin is still high,
the factory firmware will be selected, the LED will flash quickly for 1.5 seconds
and the WiPy will proceed to boot. The firmware selection mechanism is as follows:
Safe Boot Pin GP28 released during:
1st 3 secs window |
2nd 3 secs window |
Final 1.5 secs window |
|---|---|---|
Safe boot, latest
firmware is selected
|
Safe boot, previous
user update selected
|
Safe boot, the factory
firmware is selected
|
On all of the above 3 scenarios, safe boot mode is entered, meaning that
the execution of both boot.py and main.py is skipped. This is
useful to recover from crash situations caused by the user scripts. The selection
made during safe boot is not persistent, therefore after the next normal reset
the latest firmware will run again.
The heartbeat LED
By default the heartbeat LED flashes once every 4s to signal that the system is
alive. This can be overridden through the wipy module:
>>> import wipy
>>> wipy.heartbeat(False)
There are currently 2 kinds of errors that you might see:
If the heartbeat LED flashes quickly, then a Python script (eg
main.py) has an error. Use the REPL to debug it.If the heartbeat LED stays on, then there was a hard fault, you cannot recover from this, the only way out is to press the reset switch.
Details on sleep modes
machine.idle(): Power consumption: ~12mA (in WLAN STA mode). Wake sources: any hardware interrupt (including systick with period of 1ms), no special configuration required.machine.lightsleep(): 950uA (in WLAN STA mode). Wake sources arePin,RTCandWLANmachine.deepsleep(): ~350uA. Wake sources arePinandRTC.
Additional details for machine.Pin
On the WiPy board the pins are identified by their string id:
from machine import Pin
g = machine.Pin('GP9', mode=Pin.OUT, pull=None, drive=Pin.MED_POWER, alt=-1)
You can also configure the Pin to generate interrupts. For instance:
from machine import Pin

def pincb(pin):
    print(pin.id())

pin_int = Pin('GP10', mode=Pin.IN, pull=Pin.PULL_DOWN)
pin_int.irq(trigger=Pin.IRQ_RISING, handler=pincb)
# the callback can be triggered manually
pin_int.irq()()
# to disable the callback
pin_int.irq().disable()
Now every time a falling edge is seen on the gpio pin, the callback will be executed. Caution: mechanical push buttons have “bounce” and pushing or releasing a switch will often generate multiple edges. See: http://www.eng.utah.edu/~cs5780/debouncing.pdf for a detailed explanation, along with various techniques for debouncing.
All pin objects go through the pin mapper to come up with one of the gpio pins.
For the drive parameter the strengths are:
Pin.LOW_POWER- 2mA drive capability.
Pin.MED_POWER- 4mA drive capability.
Pin.HIGH_POWER- 6mA drive capability.
For the alt parameter please refer to the pinout and alternate functions
table at <https://raw.githubusercontent.com/wipy/wipy/master/docs/PinOUT.png>`_
for the specific alternate functions that each pin supports.
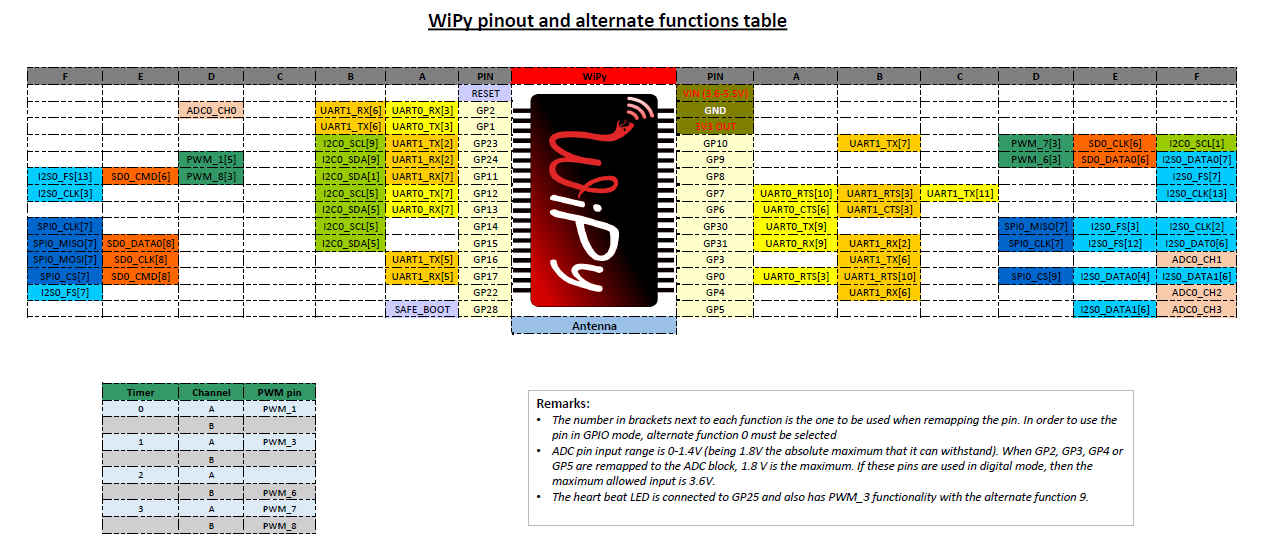
For interrupts, the priority can take values in the range 1-7. And the
wake parameter has the following properties:
If
wake_from=machine.Sleep.ACTIVEany pin can wake the board.If
wake_from=machine.Sleep.SUSPENDEDpinsGP2,GP4,GP10,GP11, GP17`` orGP24can wake the board. Note that only 1 of this pins can be enabled as a wake source at the same time, so, only the last enabled pin as amachine.Sleep.SUSPENDEDwake source will have effect.If
wake_from=machine.Sleep.SUSPENDEDpinsGP2,GP4,GP10,GP11,GP17andGP24can wake the board. In this case all of the 6 pins can be enabled as amachine.Sleep.HIBERNATEwake source at the same time.
Additional Pin methods:
-
machine.Pin.alt_list()¶ Returns a list of the alternate functions supported by the pin. List items are a tuple of the form:
('ALT_FUN_NAME', ALT_FUN_INDEX)
Additional details for machine.I2C
On the WiPy there is a single hardware I2C peripheral, identified by “0”. By default this is the peripheral that is used when constructing an I2C instance. The default pins are GP23 for SCL and GP13 for SDA, and one can create the default I2C peripheral simply by doing:
i2c = machine.I2C()
The pins and frequency can be specified as:
i2c = machine.I2C(freq=400000, scl='GP23', sda='GP13')
Only certain pins can be used as SCL/SDA. Please refer to the pinout for further information.
Known issues
Incompatible way to create SSL sockets
SSL sockets need to be created the following way before wrapping them with.
ssl.wrap_socket:
import socket
import ssl
s = socket(socket.AF_INET, socket.SOCK_STREAM, socket.IPPROTO_SEC)
ss = ssl.wrap_socket(s)
Certificates must be used in order to validate the other side of the connection, and also to authenticate ourselves with the other end. Such certificates must be stored as files using the FTP server, and they must be placed in specific paths with specific names.
The certificate to validate the other side goes in: ‘/flash/cert/ca.pem’
The certificate to authenticate ourselves goes in: ‘/flash/cert/cert.pem’
The key for our own certificate goes in: ‘/flash/cert/private.key’
Note
When these files are stored, they are placed inside the internal hidden file system (just like firmware updates), and therefore they are never visible.
For instance to connect to the Blynk servers using certificates, take the file ca.pem located
in the blynk examples folder.
and put it in ‘/flash/cert/’. Then do:
import socket
import ssl
s = socket.socket(socket.AF_INET, socket.SOCK_STREAM, socket.IPPROTO_SEC)
ss = ssl.wrap_socket(s, cert_reqs=ssl.CERT_REQUIRED, ca_certs='/flash/cert/ca.pem')
ss.connect(socket.getaddrinfo('cloud.blynk.cc', 8441)[0][-1])
Incompatibilities in uhashlib module
Due to hardware implementation details of the WiPy, data must be buffered before being
digested, which would make it impossible to calculate the hash of big blocks of data that
do not fit in RAM. In this case, since most likely the total size of the data is known
in advance, the size can be passed to the constructor and hence the HASH hardware engine
of the WiPy can be properly initialized without needing buffering. If block_size is
to be given, an initial chunk of data must be passed as well. When using this extension,
care must be taken to make sure that the length of all intermediate chunks (including the
initial one) is a multiple of 4 bytes. The last chunk may be of any length.
Example:
hash = uhashlib.sha1('abcd1234', 1001)    # length of the initial piece is multiple of 4 bytes
hash.update('1234')                       # also multiple of 4 bytes
...
hash.update('12345')                      # last chunk may be of any length
hash.digest()
Adhoc way to control telnet/FTP server via network module
The Server class controls the behaviour and the configuration of the FTP and telnet
services running on the WiPy. Any changes performed using this class’ methods will
affect both.
Example:
import network
server = network.Server()
server.deinit() # disable the server
# enable the server again with new settings
server.init(login=('user', 'password'), timeout=600)
-
class
network.Server(id, ...)¶ Create a server instance, see
initfor parameters of initialization.
-
server.init(\*, login=('micro', 'python'), timeout=300)¶ Init (and effectively start the server). Optionally a new
user,passwordandtimeout(in seconds) can be passed.
-
server.deinit()¶ Stop the server
-
server.timeout([timeout_in_seconds])¶ Get or set the server timeout.
-
server.isrunning()¶ Returns
Trueif the server is running,Falseotherwise.
Adhoc VFS-like support
WiPy doesn’t implement full MicroPython VFS support, instead following
functions are defined in uos module:
-
mount(block_device, mount_point, \*, readonly=False)¶ Mounts a block device (like an
SDobject) in the specified mount point. Example:os.mount(sd, '/sd')
-
unmount(path)¶ Unmounts a previously mounted block device from the given path.
-
mkfs(block_device or path)¶ Formats the specified path, must be either
/flashor/sd. A block device can also be passed like anSDobject before being mounted.